I see a lot of the same posts asking what are the best camera settings for [insert your drone model here]. I have been shooting with the EVO II 6K Pro for about 3yrs now and have shot in almost every condition possible; cloudy, sunlight, sunset, civil twilight, full night, even fog. For pretty much every one of those scenarios I only use a few very basic camera setting combinations. I have shared my settings in various posts over the years and thought it would be helpful to put them all in a single dedicated post.
BACKGROUND
I shoot commercially for a wide variety of project types, everything from promo videos, weddings, fashion, big events, music videos, etc. I also shoot both photography and video about evenly and have used the EVO II 6K over the past 3 years to provide video and photography footage for those projects. For my types of projects the drone is typically only in the air for a few min to get the big picture view which I then use to increase the production value of whatever the project is.
I don't kid myself, I am not shooting the next Hollywood blockbuster, or fine art for a gallery. My focus (and my camera settings reflect this) is to achieve the best quality possible in the least amount of time; so in other words I really stick to the keep it simple concept. Some of my settings below are controversial, but at the end of the day they have always achieved the goal which is to produce something commercially viable that my clients have been willing to pay for. Many of these settings would work equally well with pretty much any variable aperture drone and could just as easily be applied to DJI drones as well.
DAYLIGHT PHOTOGRAPHY
Below are my daylight photography settings. The EVO's camera is probably sharpest around F5.6, so F5.6 and ISO100 are my starting points. From there I adjust the shutter speed until the histogram shows that the image is properly exposed. Another thing that you will notice is that I use a Picture Profile of None, this makes the screen easier to see in daylight but also more importantly it sets the histogram to a Adobe RGB display and sets the preview JPG in the RAW file to Adobe RGB. I discovered a weird bug in the Autel FW where the histogram does not show the exposure for the Adobe RGB color space which makes setting the proper exposure using the histogram more difficult unless you use the "None" color profile.
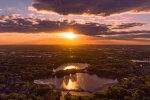
Shooting a sunset or sunrise is one of the most challenging compositions you will probably encounter since sunsets by their nature will always exceed the dynamic range (DR) of the camera. So with a sunset or sunrise you must protect the highlights (sky) and underexpose the ground while using the histogram to ensure you are not crushing the blacks. The following settings could work for a sunset. You could also create a 3 or 5 bracket HDR sequence to attempt to increase the dynamic range but picture quality would suffer. Another option is to take two shots, the first exposing for the sky, the second exposing for the ground then perform a sky replacement for the ground shot to get perfect exposure in the final composited image. This would yield the highest quality but would require the most work.
Like I previously mentioned, I am not shooting for a fine art gallery, so I simply use the following settings and skip the HDR and sky replacement.
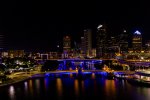
For the following two lowlight / night settings they are the only two I use and it has to be a windless night. Also, you will need plenty of city lights to take a nighttime picture; many beginners do not realize cameras need light; no exceptions. You can't simply crank the ISO to get quality footage in complete darkness.
Over the years more and more pure white LED lights are being used as city lights. If you are shooting a scene with a lot of LED city lights or if you are shooting fireworks then I recommend 3600K for the WB. If the city lights are more of the "pure white" variety then Daylight WB is a better starting point. With RAW photography the WB isn't that important, it is more important with video.
Nighttime (Least Noise but will only work on a perfectly calm night with a little color still in the sky)
Below are the settings that I use for daylight video. Many times I get asked why I use F11 and there are many misconceptions around what ND filters do and don't do. Click here to read in more detail on why I never use ND filters. It is also important here to point out that I only use 4K resolution, 30FPS, and MOV for the file format. The EVO II 6K drops down to 8bit 4:2:0 if you use MP4, 60FPS, or a resolution higher than 4K. It will only shoot 10bit when using MOV and 4K resolution or at least that is true for the firmware version that I am running. Newer FW versions might have changed this.
For night video, below are the only settings that I use. Yes 1/30s is not 2x the framerate, but I care more about getting as much light as possible into the sensor than I do about a little additional motion blur.
SAMPLES
Below are some sample images and a sample video shot using these exact settings.


CONCLUSION
Hopefully these settings will prove useful to those of you wishing to get quality footage out of your EVO II 6K or other drone camera.
IN CASE YOU MISSED IT
Why I Never Shoot Video At 24FPS
Why I Never Use CPL Filters With Drone Cameras
Autel EVO II Pro - User Experience from a DJI User
EXPLORE YOUR WORLD: An Autel EVO II Pro 6K Cinematic Story
Only the Histogram Tells the Truth - EVO II 6K Exposure Oddity
BACKGROUND
I shoot commercially for a wide variety of project types, everything from promo videos, weddings, fashion, big events, music videos, etc. I also shoot both photography and video about evenly and have used the EVO II 6K over the past 3 years to provide video and photography footage for those projects. For my types of projects the drone is typically only in the air for a few min to get the big picture view which I then use to increase the production value of whatever the project is.
I don't kid myself, I am not shooting the next Hollywood blockbuster, or fine art for a gallery. My focus (and my camera settings reflect this) is to achieve the best quality possible in the least amount of time; so in other words I really stick to the keep it simple concept. Some of my settings below are controversial, but at the end of the day they have always achieved the goal which is to produce something commercially viable that my clients have been willing to pay for. Many of these settings would work equally well with pretty much any variable aperture drone and could just as easily be applied to DJI drones as well.
DAYLIGHT PHOTOGRAPHY
Below are my daylight photography settings. The EVO's camera is probably sharpest around F5.6, so F5.6 and ISO100 are my starting points. From there I adjust the shutter speed until the histogram shows that the image is properly exposed. Another thing that you will notice is that I use a Picture Profile of None, this makes the screen easier to see in daylight but also more importantly it sets the histogram to a Adobe RGB display and sets the preview JPG in the RAW file to Adobe RGB. I discovered a weird bug in the Autel FW where the histogram does not show the exposure for the Adobe RGB color space which makes setting the proper exposure using the histogram more difficult unless you use the "None" color profile.
- Aperture: F5.6
- ISO: 100
- Shutter Speed: 1/200s | 1/400s | 1/600s (depending on how bright or cloudy the day is. If you pick Aperture priority mode this will be handled automatically for you)
- WB: Daylight
- Picture Profile: None
- File Format: RAW
Shooting a sunset or sunrise is one of the most challenging compositions you will probably encounter since sunsets by their nature will always exceed the dynamic range (DR) of the camera. So with a sunset or sunrise you must protect the highlights (sky) and underexpose the ground while using the histogram to ensure you are not crushing the blacks. The following settings could work for a sunset. You could also create a 3 or 5 bracket HDR sequence to attempt to increase the dynamic range but picture quality would suffer. Another option is to take two shots, the first exposing for the sky, the second exposing for the ground then perform a sky replacement for the ground shot to get perfect exposure in the final composited image. This would yield the highest quality but would require the most work.
Like I previously mentioned, I am not shooting for a fine art gallery, so I simply use the following settings and skip the HDR and sky replacement.
- Aperture: F5.6
- ISO: 100
- Shutter Speed: 1/1000s (could be less or more depending on the exposure for the sunset)
- WB: Daylight
- Picture Profile: None
- File Format: RAW
For the following two lowlight / night settings they are the only two I use and it has to be a windless night. Also, you will need plenty of city lights to take a nighttime picture; many beginners do not realize cameras need light; no exceptions. You can't simply crank the ISO to get quality footage in complete darkness.
Over the years more and more pure white LED lights are being used as city lights. If you are shooting a scene with a lot of LED city lights or if you are shooting fireworks then I recommend 3600K for the WB. If the city lights are more of the "pure white" variety then Daylight WB is a better starting point. With RAW photography the WB isn't that important, it is more important with video.
Nighttime (Least Noise but will only work on a perfectly calm night with a little color still in the sky)
- Aperture: F2.8
- ISO: 100
- Shutter Speed: 1/5s
- WB: 3600K (or Daylight)
- Picture Profile: None
- File Format: RAW
- Aperture: F2.8
- ISO: 800
- Shutter Speed: 1/20s
- WB: 3600K (or Daylight)
- Picture Profile: None
- File Format: RAW
Below are the settings that I use for daylight video. Many times I get asked why I use F11 and there are many misconceptions around what ND filters do and don't do. Click here to read in more detail on why I never use ND filters. It is also important here to point out that I only use 4K resolution, 30FPS, and MOV for the file format. The EVO II 6K drops down to 8bit 4:2:0 if you use MP4, 60FPS, or a resolution higher than 4K. It will only shoot 10bit when using MOV and 4K resolution or at least that is true for the firmware version that I am running. Newer FW versions might have changed this.
- Aperture: F11
- ISO: 100
- Shutter Speed 1/200 (or 1/320 or 1/400 or 1/500 depending on what is needed for the proper exposure)
- WB: Daylight
- Picture Profile: LOG
- File Format: MOV
- Image Resolution: 4K
- Frames Per Second: 30FPS
For night video, below are the only settings that I use. Yes 1/30s is not 2x the framerate, but I care more about getting as much light as possible into the sensor than I do about a little additional motion blur.
- Aperture: F2.8
- ISO: 800
- Shutter Speed 1/30
- WB: 3600K (Or Daylight)
- Picture Profile: LOG
- File Format: MOV
- Image Resolution: 4K
- Frames Per Second: 30FPS
SAMPLES
Below are some sample images and a sample video shot using these exact settings.


CONCLUSION
Hopefully these settings will prove useful to those of you wishing to get quality footage out of your EVO II 6K or other drone camera.
IN CASE YOU MISSED IT
Why I Never Shoot Video At 24FPS
Why I Never Use CPL Filters With Drone Cameras
Autel EVO II Pro - User Experience from a DJI User
EXPLORE YOUR WORLD: An Autel EVO II Pro 6K Cinematic Story
Only the Histogram Tells the Truth - EVO II 6K Exposure Oddity
Last edited:


