Welcome, Autel Pilots!
Join our free Autel drone community today!
Join Us

Well, I finally crashed the Nano+

geekdaddy

Active Member
Joined
Oct 29, 2020
Messages
28
Reaction score
39
Age
61
Been flying the Nano+ for about 7 months. Purchased thru private sale. It was an Autel Care replacement to the previous owner who sold it to me. So I got a new drone at a good price but the drone wasn't eligible for a new Autel Care contract.

Flew without incident. Tested in high winds to understand it's limits. No issues. Despite the complaints here, I really like the little nano+.

But last week, I decided to try the automated flights. I normally fly everything manually. I setup a flick manuver, and hoped/assumed the OA would clear my home and a few other obstacles in the area. Had my finger on the "stop" button and let it go. I thought it was going to clear my roof but clipped the upper ridge vent and fell two stories onto my deck. Note to self: Only use automated manuvers in wide open spaces (if ever) in the future.

Upon initial exam, everything seemed great. Not a scratch on it, powered up, gimble worked, connected to the controller. But then I noticed the two right-hand motors wouldn't spin-up. The Nano+ hit the deck on it's right hand side and didn't break the legs but broke the props and damaged the motors. When manually rotating them, they don't turn smoothly. It's too bad since they "look" great. The motors are tiny, complex, and sensitive so I'm not going to try to fix them.

This isn't a warranty claim and I don't have autel care, so it's gonna take several weeks and probably $150+ and shipping costs. Instead, I sourced two new right-hand (front/rear) leg and motor assemblies off Aliexpress for $60 and will attempt the repairs myself. Doesn't look too challenging based on a few youtube videos I've watched. I also had some prior success with gopro karma and parrot anafi repairs. The Karma was big and built like a tank. It was easy to service. The nano+ has soldered sires to the controller board vs connectors on the other birds, but the anafi required darn near full disassembly and the wire routing was insane -- I think the nano+ MIGHT be a little easier. Will report back after the parts arrive in another week or so...
 
I just crashed mine too.. Got too close to a tall tree that was just starting to put out leaves. Almost saved it but a prop struck a twig and it fell about 30' hitting s few branches on the way. Thankfully the battery popped out making the drone not hit the grass as hard as it would have. Landed flat on the back and somehow no damage at all.

I agree you should be able to repair easily if you have the tools and some experience with electronics.
 
Sorry to hear that :(
I fear that moment every time since I fly over water 99% of the time.

Please update when you do your repairs :)

Thanks!
 
  • Like
Reactions: JerryPikePhoto
That must've been so disappointing.
I mostly only fly in wide open spaces, but I do sometimes fly close to buildings or trees. For instance at times will fly over a structure or through a forest, amongst trees.
When I fly near structures or trees, I stand VERY close to the structure or tree, ensuring I have a good view for a clear flight path. I've learned that there can easily be thin little protruding tree branches that are difficult to see, unless you are really close to the drone. When I fly through a forest, I am rarely more than 10 to 15 feet behind the drone. Sometimes only 3 to 5 ft behind it. VERY close to it, to be sure to see what is in its flight path. I've learned that one can patch together several flight videos, to make a flight through a forest look seamless, even if in fact it involved a lot of starts and stops to navigate and watch for obstacles.
 
  • Like
Reactions: michaelnel
Repairs are underway. One arm arrived. Still waiting on the other.

Compared to some of the youtube disassembly instructions, my Nano+ has a dab of a rubbery substance (silicon) across all the solder joints, connectors, and in a few wire locations. The other videos I saw didn't show this -- wondering if Autel adopted this process as a manufacturing improvement at some point. Was fairly easy to remove with an exacto. These videos are good references. One only pops the case. The other goes further but the video quality isn't as good:

Most difficult part was popping the shell parts off. Had concerns about breaking them but everything eventually came apart without incident. Unsoldered the motor control wires. Will reassemble after the other leg arrives. As long as the re-solder of the new wires goes ok (space is a little tight) everything should be ok.
 
  • Like
Reactions: lifeisfun
UPDATE: Took awhile for the second arm to arrive from PRC, and then took awhile to find the time and courage to start soldering the wires. Finally got to it last night. After soldering the wires and reconnecting the antenna, gave it a test power-on, connected to the controller, and spun up the motors while holding it. No errors and all seems good! I've ordered some non-corrosive PCB adhesive to re-glue the solder joints and connectors like the factory did, and then I'll pop the shell back on and take it for a spin! Cost of the fix was $60 for two arms/motors and a few hours to study repair options, disassemble, and reassemble...

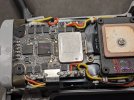
Here's a pic from a few weeks ago after desoldering one set of wires and getting ready for the others...
PXL_20230430_015717741.jpg
 
It's great that everything was fixed successfully. Three crashes damaged one motor - it bent the shaft. I manually straightened it, so it flies, but there are vibrations. I plan to replace it, but I want to experiment and replace all the motors with DJI Mini 3 Pro. The only thing is, before doing that, I wanted to check if DJI motors have similar kv values (motor revolutions per volt). I found this information for DJI motors, but not for the Nano motors. Perhaps someone has come across this information?
 
UPDATE: Took awhile for the second arm to arrive from PRC, and then took awhile to find the time and courage to start soldering the wires. Finally got to it last night. After soldering the wires and reconnecting the antenna, gave it a test power-on, connected to the controller, and spun up the motors while holding it. No errors and all seems good! I've ordered some non-corrosive PCB adhesive to re-glue the solder joints and connectors like the factory did, and then I'll pop the shell back on and take it for a spin! Cost of the fix was $60 for two arms/motors and a few hours to study repair options, disassemble, and reassemble...

Here's a pic from a few weeks ago after desoldering one set of wires and getting ready for the others...
CONGRATS!
Thanks for posting back with the update!
 
UPDATE: 3 test flights and all is good now -- the $60 DIY repair is a success! A few lessons learned for those who may want to do the same:
  • Shop for the lowest price on parts via ebay, aliexpress, and/or other sites.
  • Use the online references I shared earlier for instructions about how to remove the shell etc.
  • Carefully observe and photograph the colored wire orientations and cable routing at each disassembly point.
  • Invest in a good tiny screwdriver set. Use magnifiers or good readers if you're over 29 years old (the nano is, uh, very tiny inside)
    • Be careful to use the correct philips screw-driver size and carefully align, insert, and apply pressure to avoid stripping the screw heads.
  • During reassembly, check, and double check that all connectors are seated properly and glued as well (even if you didn't purposefully disconnect them)
    • Perform a test power-up with the top shell removed to check basic functionality.
The screws are tiny and tight, and I was constantly concerned that I might strip the heads -- thankfully I didn't. I had to reassemble three times because (once) I learned that my antenna cable route had obstructed the battery and then (second time) I discovered that a loose connector inside had disabled forward OA sensors. Each situation required me to disassemble (again), correct the issue and reassemble. I could have done it once if I had followed the guidelines above.

Hope this helps others. I will hopefully not crash again -- but if I do, I would do this again -- everything is easier "when you know how!"
 

Latest threads

Members online

Forum statistics

Threads
11,272
Messages
102,921
Members
9,865
Latest member
LuvNtiTTays