Welcome, Autel Pilots!
Join our free Autel drone community today!
Join Us

How do you remove the blur when shooting signage at night?

CW3Drones

Member
Joined
Sep 18, 2021
Messages
20
Reaction score
10
Age
61
Location
Kansas City, MO
Website
cw3drones.wixsite.com
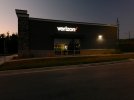
I shot the original photo in .DNG and converted it to JPG in order to upload it here. How do I remove the blurriness around the signage?
I'm flying an Autel Evo 2 8K, shooting at 100 ISO, in low light. If I can't remove it through adjustments in the drone camera settings, is there a way to remove it in post with DaVinci Resolve, or Premier Pro?

Thanks for your recommendations.
Sample.jpg
[UPDATE]
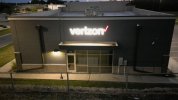
Thank you all for your recommendations. I reshot the signage and it was much more clear!
Sample1.jpg
 
Last edited:
I shot the original photo in .DNG and converted it to JPG in order to upload it here. How do I remove the blurriness around the signage?
I'm flying an Autel Evo 2 8K, shooting at 100 ISO, in low light. If I can't remove it through adjustments in the drone camera settings, is there a way to remove it in post with DaVinci Resolve, or Premier Pro?

Thanks for your recommendations.

View attachment 16165

It looks like that because it is overexposed. You exposed for ambient which in this case is night instead of exposing for the much brighter Verizon signage. To get the best results in a situation like this since the DR is pretty high between the ambient lighting and the signage you can either try a 2 or 3 shot HDR sequence which will come with its own list of challenges (ghosting, blurriness, etc.) or just prioritize your exposure by exposing for the signage and underexposing the ambient then in post lifting the shadows while trying not to lift the noise at the same time. To expose for the signage since I think the 8K has a fixed aperture, you would need to raise the shutter speed.

There's no way to recover the signage at this point for this particular image because it is so over exposed it is clipped. The 8K will never look great in this scenario due to the tiny sensor and limited DR, the 6K would fare better and some of the newer sensors would probably be even better.
 
  • Like
Reactions: CW3Drones
It looks like that because it is overexposed. You exposed for ambient which in this case is night instead of exposing for the much brighter Verizon signage. To get the best results in a situation like this since the DR is pretty high between the ambient lighting and the signage you can either try a 2 or 3 shot HDR sequence which will come with its own list of challenges (ghosting, blurriness, etc.) or just prioritize your exposure by exposing for the signage and underexposing the ambient then in post lifting the shadows while trying not to lift the noise at the same time. To expose for the signage since I think the 8K has a fixed aperture, you would need to raise the shutter speed.

There's no way to recover the signage at this point for this particular image because it is so over exposed it is clipped. The 8K will never look great in this scenario due to the tiny sensor and limited DR, the 6K would fare better and some of the newer sensors would probably be even better.
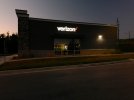
I made a couple of adjustments and shot a 3-burst AEB and got a much better result! Thanks for the recommendation. Sample1.jpg
 
  • Like
Reactions: herein2021
I made a couple of adjustments and shot a 3-burst AEB and got a much better result! Thanks for the recommendation. View attachment 16178

Yes! That is exactly what I had in mind, good job. If you add about 50% post sharpening, drop the shadows a bit, and increase the contrast via the curves you will squeeze every bit of quality possible out of that image. Bracketed shots tend to decrease sharpness, and contrast, but as long as it wasn't a windy day you can get most of that back with a few quick post adjustments. When I shot a lot of real estate I had to work with brackets quite a bit.

Also, if you are using LR add some slight denoising and then slide the texture control up a bit, it will really make the image pop and get rid of some of the shadow noise.
 
Last edited:
  • Like
Reactions: CW3Drones
Yes! That is exactly what I had in mind, good job. If you add about 50% post sharpening, drop the shadows a bit, and increase the contrast via the curves you will squeeze every bit of quality possible out of that image. Bracketed shots tend to decrease sharpness, and contrast, but as long as it wasn't a windy day you can get most of that back with a few quick post adjustments. When I shot a lot of real estate I had to work with brackets quite a bit.

Also, if you are using LR add some slight denoising and then slide the texture control up a bit, it will really make the image pop and get rid of some of the shadow noise.
That is so good - and so helpful! Thank you for that. I have LR and Premier but (thankfully) for this job it wasn't needed, since I really need to spend some time with both applications to improve.

Thanks again for your support!
~
EM
 
  • Like
Reactions: herein2021

Latest threads

Members online

No members online now.

Forum statistics

Threads
11,292
Messages
103,027
Members
9,903
Latest member
Aerugo