

You are using an out of date browser. It may not display this or other websites correctly.
You should upgrade or use an alternative browser.
You should upgrade or use an alternative browser.
"Washed Out" pics
- Thread starter ovrszd
- Start date

Jagerbomb52
Well-Known Member
Manual settings or a good photo editor,
Edited in Luminar 4

Edited in Luminar 4

Jagerbomb52
Well-Known Member
For me its a matter of setting it to manual, adjusting the ISO and\or shutter speed plus or minus to my liking. You can also tap the screen to adjust the white balance I believe in auto.
Best thing is set it on the kitchen table and start playing with the settings to see what they do. Start watching some youtube videos on drone photography to see what settings they recommend and see if the EVO II has those settings. Unfortunately most are geared to DJI but you can learn lots from them.
Best thing is set it on the kitchen table and start playing with the settings to see what they do. Start watching some youtube videos on drone photography to see what settings they recommend and see if the EVO II has those settings. Unfortunately most are geared to DJI but you can learn lots from them.
claudius62
Well-Known Member
- Joined
- Sep 16, 2019
- Messages
- 877
- Reaction score
- 497
- Age
- 72
Simply play with the E.V.
Go up in the clear figure of the image.
Going down in the number darkens the image and gives more contrast and color.
This setting works even in Auto mode and is in the scroll bar at the bottom. Search for EV and Play with it. You will see.
Go up in the clear figure of the image.
Going down in the number darkens the image and gives more contrast and color.
This setting works even in Auto mode and is in the scroll bar at the bottom. Search for EV and Play with it. You will see.
Rubik3x
Well-Known Member
ND filters won't be of much value for still photos unless you are trying to get blurs like waterfall or river blurs. Without ND filters, your shutter speed will be very high in bright daylight. This can be an advantage for aerial photos as it freezes the motion helping to put everything in sharp focus. ND filters allow you to lower the shutter speed. For videos, that provides a satisfying amount of motion blur during camera or subject movement. Otherwise the video will have an unpleasant staccato effect (rapid still images that don't blend together well).Yes, good editor.
Is there a way to take a pic like this that does not need edited? Is manual settings the only way? Is there value in ND filters?
Another thing that will help you in Auto Exposure mode is to set the EV to -0.3 to -0.7. This camera tends to overexpose slightly in Auto. Another thing you can do in Auto mode is change the Style settings. Set sharpness to -2, contrast to +1 and saturation to +1. Experiment with other Style settings to suit your eye.
For the best results, Manual Exposure will give you the most control and prevent unwanted exposure changes during the video. When you get comfortable with color correction in your editor, you may want to try LOG mode. There are advantages to this such as 10-bit color (no color banding in the blue sky) and greater potential dynamic range (ability to distinguish more details in both bright and dark areas).
You've got yourself a pretty sophisticated flying camera. I look forward to seeing photos and videos from you.
rangerb3
Well-Known Member
- Joined
- Mar 7, 2021
- Messages
- 70
- Reaction score
- 23
- Age
- 63
My pictures come washed out as well. I'll play with the settings you have suggested. Just started flying my Evo 2 8k so learning how to fly is getting easier to the point that now I can start playing with the camera settings...Thanks for the tips Rubik. I'll give them a try.
Don't set your expectation bar too high.
herein2021
Well-Known Member
My pictures come washed out as well. I'll play with the settings you have suggested. Just started flying my Evo 2 8k so learning how to fly is getting easier to the point that now I can start playing with the camera settings...
The main source of "washed out" pictures are due to over exposure. Your computer screen, your phone screen, and the EV value in the app will all lie to you every single time. When you are filming the most reliable exposure tool is the histogram.
Turn on the histogram and for images you want to ensure the histogram shows properly exposed for low dynamic range images and under exposed for high dynamic range images like sunsets. Learning how to read and properly use histograms is a whole different topic but once you can read a histogram it will become your most reliable exposure tool no matter what camera you are using.
Also, do not be afraid to under expose, people starting out tend to over expose the image because they don't want any shadows on their monitor screen. Doing so blows out the highlights, reduces the contrast, and makes the image look washed out.
Below I have included a good example of this......if I were just starting out there's no way I would have shot the image this under exposed; but I know how much can be recovered in post and I wanted to protect the sunset's colors so I deliberately shot with the ground under exposed and was able to recover it nicely in post. Of course this only applies if you are shooting raw images, for JPGs you need to get it right in camera because you can't fix it by much later.
If you want to try to fix the images you already have, you can try adding contrast to the images which should help some. You can also use the curves to refine the black point and white point which will also reduce the washed out look.
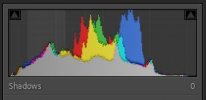
Here is the histogram that I was looking at when I shot the images below; obviously it shows the image is pretty heavily under exposed. But the histogram also tells me that I didn't clip the blacks so I knew I could recover them in post.


DsPallasVI
Member
- Joined
- Mar 28, 2021
- Messages
- 7
- Reaction score
- 1
- Age
- 62
herein2021
Well-Known Member
What do you mean by ".. didn't clip the blacks..."?
Clipping the blacks is where you under expose to the point that the shadows are unrecoverable. If you under expose to the point to where if you try to lift the shadows in post they are nothing but noise or have lost all of their color then you have clipped the blacks.
The histogram shows I under exposed but kept it right above the point where the blacks (shadows) would have been unrecoverable which is why the ground still has color after post processing the image vs the unprocessed image where the ground is pitch black.
DsPallasVI
Member
- Joined
- Mar 28, 2021
- Messages
- 7
- Reaction score
- 1
- Age
- 62
Thank you, that explains it.Clipping the blacks is where you under expose to the point that the shadows are unrecoverable. If you under expose to the point to where if you try to lift the shadows in post they are nothing but noise or have lost all of their color then you have clipped the blacks.
The histogram shows I under exposed but kept it right above the point where the blacks (shadows) would have been unrecoverable which is why the ground still has color after post processing the image vs the unprocessed image where the ground is pitch black.
My Evo-II 6K keeps showing me washed pics... I'll try and play with the EV settings to see if I can get the Histogram more balanced out...
herein2021
Well-Known Member
Thank you, that explains it.
My Evo-II 6K keeps showing me washed pics... I'll try and play with the EV settings to see if I can get the Histogram more balanced out...
Here are some normal daylight images of downtown Tampa. I used the histogram to expose all of them. They are all F5.6, ISO100, 1/1000s shutter speed, daylight WB shot raw and post processed in Lightroom. To get the most out of pretty much any modern sensor you have to shoot raw and post process them. These to me look like something I could deliver to a commercial client. Plenty of color in the sky, proper contrast, and good lows.
I also recommend always shooting manual mode to get the most out of the sensor. Completely ignore the EV readout (it's wildly inaccurate) and just look at the histogram. ISO100, F5.6, and Daylight WB should get you started. Then just use the shutter speed to get the histogram to show a properly exposed image.
.jpg")
.jpg")
.jpg")
.jpg")
.jpg")
.jpg")
Here is the histogram for image 1 above. It tells me the entire dynamic range of the scene fits within the dynamic range of the sensor which is as it should be since there's no harsh sunlight or deep shadows in the image and that the image is properly exposed.
Keep in mind that this is just properly exposing the image, it could still end up washed out if it is not properly post processed. Properly exposing the image is just the first step unless you are shooting JPG at which point most of the data is pretty much baked into the image.

Attachments
Last edited:
DsPallasVI
Member
- Joined
- Mar 28, 2021
- Messages
- 7
- Reaction score
- 1
- Age
- 62
Thanks, great shots!Here are some normal daylight images of downtown Tampa. I used the histogram to expose all of them. They are all F5.6, ISO100, 1/1000s shutter speed, daylight WB shot raw and post processed in Lightroom. To get the most out of pretty much any modern sensor you have to shoot raw and post process them. These to me look like something I could deliver to a commercial client. Plenty of color in the sky, proper contrast, and good lows.
I also recommend always shooting manual mode to get the most out of the sensor. Completely ignore the EV readout (it's wildly inaccurate) and just look at the histogram. ISO100, F5.6, and Daylight WB should get you started. Then just use the shutter speed to get the histogram to show a properly exposed image.
View attachment 10073View attachment 10074View attachment 10075View attachment 10076View attachment 10077View attachment 10078
Using a Polarizing filter all the time (US Virgin Islands Tropics, with bright Sun) and never had an issue with the DJI Mavic 2 Pro pics. The Autel Evo-II (with polarizing filter) keeps giving me washed out pics all the time. Next time I'll try the settings you recommend.
Have attached here two (Mavic) pics.. but never seem to be able to get these vivid pics with my Autel Evo-II.
Attachments


DsPallasVI
Member
- Joined
- Mar 28, 2021
- Messages
- 7
- Reaction score
- 1
- Age
- 62
Btw, always shoot in RAW... Not familiar with the LOG procedure.Thanks, great shots!
Using a Polarizing filter all the time (US Virgin Islands Tropics, with bright Sun) and never had an issue with the DJI Mavic 2 Pro pics. The Autel Evo-II (with polarizing filter) keeps giving me washed out pics all the time. Next time I'll try the settings you recommend.
Have attached here two (Mavic) pics.. but never seem to be able to get these vivid pics with my Autel Evo-II.
Stepped away from Lightroom v5, and am now using Luminar 4.
herein2021
Well-Known Member
Thanks, great shots!
Using a Polarizing filter all the time (US Virgin Islands Tropics, with bright Sun) and never had an issue with the DJI Mavic 2 Pro pics. The Autel Evo-II (with polarizing filter) keeps giving me washed out pics all the time. Next time I'll try the settings you recommend.
Have attached here two (Mavic) pics.. but never seem to be able to get these vivid pics with my Autel Evo-II.
I'm not a fan of any filters for drones especially CPLs, but that's a different topic for a different day. In those images your CPL is adding some pretty bad artifacts along the top of the image which is the problem with CPLs and drones (its nearly impossible to keep them at 90 degrees relative to the sun).
I live in FL and we have the same harsh sun and I've shot projects in the US and British Virgin Islands.....never used a CPL and did not have any problems with getting the footage to look the way I wanted. Your CPL is demonstrating why I never use them.....those particular images I would not be able to deliver to a commercial client. Below are some of the reasons why.
If you just use the histogram, shoot raw, properly expose the image, then in post add saturation (if that type of look suits you), you can get some amazing results especially in the Virgin Islands.

herein2021
Well-Known Member
Btw, always shoot in RAW... Not familiar with the LOG procedure.
Stepped away from Lightroom v5, and am now using Luminar 4.
I tried Luminar but went back to Lightroom. Keep in mind Lightroom is famous for its accurate RAW rendition, there's a possibility that Luminar is not properly processing the RAW data. I am by no means a fan of paying the Adobe subscription fees (in fact its a pet peeve of mine), but I have yet to find another commercially viable product that works as good as Lightroom.
DsPallasVI
Member
- Joined
- Mar 28, 2021
- Messages
- 7
- Reaction score
- 1
- Age
- 62
That's the reason I dropped out of Lightroom, found the yearly fee to be ridiculous. Don't mind a one-time buyers fee, but paying every year again?I tried Luminar but went back to Lightroom. Keep in mind Lightroom is famous for its accurate RAW rendition, there's a possibility that Luminar is not properly processing the RAW data. I am by no means a fan of paying the Adobe subscription fees (in fact its a pet peeve of mine), but I have yet to find another commercially viable product that works as good as Lightroom.
Yes, Luminar is not perfect... it's frustratingly slow, even on my water cooled processor PC... but haven't found anything else to replace it with.
Have noticed the uneven gradient and the green color cast before, but couldn't figure out what was causing that.
The banding showed of course in more pics too! Quite annoying to say the least.
Have been wondering about the Pol filter for some time now...
Even though there's a mark on both rings where it's supposed to be the strongest effect, it never lines up with where the polarizing effect is strongest, which seems to make it worse then.
In the end it seems, you end up with a filter that's not even doing what it's supposed to do. Plus with the way my drone moves, you're never in control to get the best effect out of it, with the constantly changing angles and directions.
Will try it the next time without the polarizing filter...
Many thanks for the tips! Much appreciated!
Similar threads
- Replies
- 2
- Views
- 2K
- Replies
- 1
- Views
- 505
- Replies
- 11
- Views
- 711


Latest threads
-
-
-
Seeking Recommendations for Custom Voiceover Solutions
- Started by nobes
- Replies: 1
-
We need your Autel evo 2 V1 6K rugged bundle.
- Started by Autel-euducational
- Replies: 1
-
Questions on original Evo 1 and the new app Autel Sky
- Started by jaja6009
- Replies: 0