Welcome, Autel Pilots!
Join our free Autel drone community today!
Join Us

Photogrammetry with Evo and Evo II

Ansia

Well-Known Member
Joined
Jan 10, 2019
Messages
4,060
Reaction score
2,232
Age
40
Location
Isla del Encanto
Hello Everyone,

Here is some small tips to make photogrammetry with your Evo drones.

Most of us enjoy using our drones with automated missions with 3rd party apps (if you use other brand drones) or use the Mission area in the Explorer app. I have found that if you perform the mission manually, you can achieve better results in your photogrammetry.

Here is the one I did yesterday for a refurbishing project I will be doing in the next few months.
Ridgetop 1.jpg

For best results, I recommend that you make a zig zag pattern above the building and after you have finished doing so, do another zig zag pattern, but in the other direction. For clarification, do the zig zag from north to south, then from east to west. Once you have completed this pattern, do a low fly by taking photos around the sides of the building. Remember to keep a bit of distance, so the building doesn't block satellites, thus making the photos lose their location.

Ridgetop 2.jpg

***** IMPORTANT *******

Always try to keep a 70% overlap or better for best results. I did not follow this rule in the low photos and I lost a bit of resolution in the end results.

Ridgetop 3.jpg

For processing, I have found that Agisoft Metashape has been the easiest for me to process these projects locally.

If you have any questions, please do not hesitate to ask in the posts below.
 
i just don't seem to get the whole point of Photogrametry... i have a 4k vid of the same image, what more can somebody want??
 
i can fly the evo in circles around an object , so one gets the same effect.. what commercial purpose does it serve to replace the video recording? how is it different in term of inspection??
 
I will Ansia answer your question as this is what he does for a living. He is better suited to answer your question.
 
With 3D photogrammetry you can actually measure distance, volumes, etc for project quotes in construction, looks great in a presentation and if done correctly you can actually see the defects on the building, which is faster to look at the office with a single file, rather than on site or going through hundreds of photographs.

My company actually saves up to $50,000 a year from this.
 
ok.. how did you save $50k a year doing this?
Just to name a few. We can photograph a building within an hour and examine the health of the building from the photogrammetry within 1 or 2 days, which saves the need to rent a suspended scaffolding and weeks or months of an engineer having to spend searching for damages in the exterior walls. If the engineers are free to perform other jobs, there is more income coming in. All of this translate to money saved.

We are a small company, I'm sure those multimillionaire companies can save up to the 6 digits.
 
  • Like
Reactions: Tufargon
I am very interested in photogrammetry. I did a 2 week trial of Pix4D, but I can't justify the software cost. How does Agisoft Metashape compare to Pix4D re features and cost?
Best.
 
i just don't seem to get the whole point of Photogrametry... i have a 4k vid of the same image, what more can somebody want??

I don't think anyone has mentioned this yet, but the whole point of photogrammetry is to greatly simplify the process of creating a 3D model, that is photo realistic. The normal process of 3D modeling is quite difficult and very time consuming. If you're paying someone by the hour to create a model of your building, Photogrammetry is much cheaper. A video recording and a 3D model are not equal- consider your example of creating an orbit around the building.... so now you have a static video that you can only view one way- so depending on how you filmed it- the uses could be limited.

Now consider a 3D model. That you can manipulate in real time. You are no longer restricted to a single view point, but you can zoom out, zoom in, and setup virtual tours and use one model a zillion different ways. I think that is one of the main things people have left out here that might help you see their different utilities.

Photogrammetry is also used in gaming and creating virtual worlds.
 
Hello Everyone,

Here is some small tips to make photogrammetry with your Evo drones.

Most of us enjoy using our drones with automated missions with 3rd party apps (if you use other brand drones) or use the Mission area in the Explorer app. I have found that if you perform the mission manually, you can achieve better results in your photogrammetry.

Here is the one I did yesterday for a refurbishing project I will be doing in the next few months.
View attachment 7711

For best results, I recommend that you make a zig zag pattern above the building and after you have finished doing so, do another zig zag pattern, but in the other direction. For clarification, do the zig zag from north to south, then from east to west. Once you have completed this pattern, do a low fly by taking photos around the sides of the building. Remember to keep a bit of distance, so the building doesn't block satellites, thus making the photos lose their location.

View attachment 7712

***** IMPORTANT *******

Always try to keep a 70% overlap or better for best results. I did not follow this rule in the low photos and I lost a bit of resolution in the end results.

View attachment 7713

For processing, I have found that Agisoft Metashape has been the easiest for me to process these projects locally.

If you have any questions, please do not hesitate to ask in the posts below.
This is super cool! Good job!
 
  • Like
Reactions: Mikecmix and Ansia
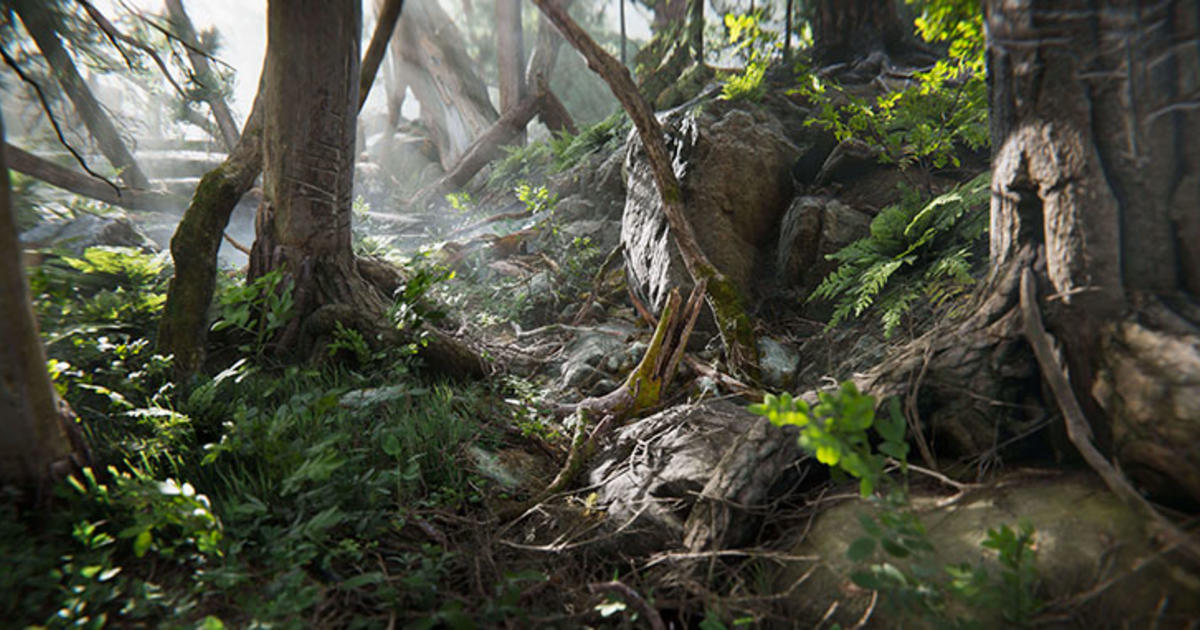
I’ve been testing the II Pro in a CG photogrammetry workflow which sometimes involves going out to a remote location and looking for opportunistic “cool stuff” to capture in nature as a starting point or reference for general purpose assets (think large cliffs, rock formations, interesting trees, etc). The concept of mission planning in this scenario is a bit cumbersome and I usually just go with manual flight. So one tip is that with enough light, recording 6k video with proper settings to reduce blur (fast shutter, low iso) seems quite good and sufficient for high quality reconstruction since the resolution is so high and the sensor is good quality. Here is a waterfall I captured in about 10 minutes manually under a dense jungle canopy with a low flight ceiling. I then exported the video at 1 FPS for a total of almost 600 frames. At High Quality I was able to get 180 million polygons in Reality Capture (can’t recall the avg edge length at the moment). For my purposes (game development), this is plenty of detail to take into Zbrush with vertex colors to start cleaning, extracting the good parts, and working away!

92DD38EA-B0ED-4669-BFDB-ACAA6DDB6812.jpeg

One thing I’d love is to be able to “replay” a manual flight to do multiple passes of a subject and capture an additional zoom level and gimbal rotation. Here I did all that manually. Higher resolution image attached.
 

Attachments

  • D9350366-429C-4A9D-B1CC-9AC7B568AFA0.jpeg
    5.6 MB · Views: 36
  • Like
Reactions: AirStag and Ansia
I am very interested in photogrammetry. I did a 2 week trial of Pix4D, but I can't justify the software cost. How does Agisoft Metashape compare to Pix4D re features and cost?
Best.
With Pix4D, you have to use their servers to process your photos/video and have to pay a monthly fee. With Agisoft, it's a one time payment and the software is yours. You do need a powerful computer to process the data, though.

I’ve been testing the II Pro in a CG photogrammetry workflow which sometimes involves going out to a remote location and looking for opportunistic “cool stuff” to capture in nature as a starting point or reference for general purpose assets (think large cliffs, rock formations, interesting trees, etc). The concept of mission planning in this scenario is a bit cumbersome and I usually just go with manual flight. So one tip is that with enough light, recording 6k video with proper settings to reduce blur (fast shutter, low iso) seems quite good and sufficient for high quality reconstruction since the resolution is so high and the sensor is good quality. Here is a waterfall I captured in about 10 minutes manually under a dense jungle canopy with a low flight ceiling. I then exported the video at 1 FPS for a total of almost 600 frames. At High Quality I was able to get 180 million polygons in Reality Capture (can’t recall the avg edge length at the moment). For my purposes (game development), this is plenty of detail to take into Zbrush with vertex colors to start cleaning, extracting the good parts, and working away!

View attachment 7751

One thing I’d love is to be able to “replay” a manual flight to do multiple passes of a subject and capture an additional zoom level and gimbal rotation. Here I did all that manually. Higher resolution image attached.
Very nice. How does it compare when you extract it from a video vs photos? I have found that for my job, anything above medium isn't really worth it and it's really time consuming, but it's very interesting to see other applications for photogrammetry. I did a building in ultra high last week and it looked great, but it brought 10 times the garbage around it, which I am still cleaning off. ?
 
I haven't really tested the photos yet since the resolution is similar, but it may in fact be higher quality since there would presumably be less compression / blurriness. I'll have to try your technique for timelapse shots and see how it works out!

I prefer Reality Capture over Agisoft, at least for my purposes. I feel it does a better job with aligning images and makes smarter default choices about scale and ground plane on arbitrary captures. I also like the way it processes meshes in that it goes to whatever resolution is inherent in your images at a pixel level (or downscaled setting) via depth map construction vs having to think about how many polygons might be needed ahead of time or generating it from a dense point cloud.

For anyone interested, here's a fun link and guide on Photogrammetry for games by Unity devs which includes some brief mention of drone use:

 
I suck at chunk merging and marking points in alignment. I dread running out of battery in the middle of a mission, so I don't have to do it.
 
I suck at chunk merging and marking points in alignment. I dread running out of battery in the middle of a mission, so I don't have to do it.
Yeah Reality Capture rarely ever gives me multiple chunks (components). I even added about 10 shots from a DSLR to this waterfall for the lower right interior and it realigned most of them with only a few points necessary on a couple DSLR images that didn't have enough overlap with the drone (about 6 total if I recall to get it down to one component). I feel this is another strength of Reality Capture since I always seem to get more chunks and uncertainty with Agisoft, and Agisoft's tools to resolve any issues are more cumbersome IMHO...
 
  • Like
Reactions: Ansia
I’ve been testing the II Pro in a CG photogrammetry workflow which sometimes involves going out to a remote location and looking for opportunistic “cool stuff” to capture in nature as a starting point or reference for general purpose assets (think large cliffs, rock formations, interesting trees, etc). The concept of mission planning in this scenario is a bit cumbersome and I usually just go with manual flight. So one tip is that with enough light, recording 6k video with proper settings to reduce blur (fast shutter, low iso) seems quite good and sufficient for high quality reconstruction since the resolution is so high and the sensor is good quality. Here is a waterfall I captured in about 10 minutes manually under a dense jungle canopy with a low flight ceiling. I then exported the video at 1 FPS for a total of almost 600 frames. At High Quality I was able to get 180 million polygons in Reality Capture (can’t recall the avg edge length at the moment). For my purposes (game development), this is plenty of detail to take into Zbrush with vertex colors to start cleaning, extracting the good parts, and working away!

View attachment 7751

One thing I’d love is to be able to “replay” a manual flight to do multiple passes of a subject and capture an additional zoom level and gimbal rotation. Here I did all that manually. Higher resolution image attached.
That is very cool super. I'd be curious to see a few photos the model was made from.
 
With Pix4D, you have to use their servers to process your photos/video and have to pay a monthly fee. With Agisoft, it's a one time payment and the software is yours. You do need a powerful computer to process the data, though.


Very nice. How does it compare when you extract it from a video vs photos? I have found that for my job, anything above medium isn't really worth it and it's really time consuming, but it's very interesting to see other applications for photogrammetry. I did a building in ultra high last week and it looked great, but it brought 10 times the garbage around it, which I am still cleaning off. ?

Of course, that is the main argument against photogrammetry.... It's not great for all applications.... because like you said, the results you get back are highly unoptimized and just full of polygons... when i was a game developer, it was used pretty limitedly. It often was more time consuming to optimize a photogrammetry project then it was to just design the model from scratch by hand
 
Of course, that is the main argument against photogrammetry.... It's not great for all applications.... because like you said, the results you get back are highly unoptimized and just full of polygons... when i was a game developer, it was used pretty limitedly. It often was more time consuming to optimize a photogrammetry project then it was to just design the model from scratch by hand
I don't know about game development, but for engineering, it's a game changer.
 
  • Like
Reactions: gschulzuio

Latest threads

Members online

Forum statistics

Threads
11,287
Messages
103,007
Members
9,899
Latest member
rudymuller